Ce tutoriel fournit toutes les étapes nécessaires pour installer MySQL 8 sur Ubuntu 18.04 LTS. Les mêmes étapes pourraient être suivies pour d'autres versions d'Ubuntu.
Remarques :Afin de suivre cet article, vous devez supprimer complètement l'installation précédente du serveur MySQL installée à l'aide de l'installateur s'il est déjà installé sur le système. Vous pouvez suivre Comment supprimer complètement MySQL d'Ubuntu pour supprimer complètement l'installation précédente effectuée à l'aide du programme d'installation.
Vous pouvez également être intéressé par d'autres tutoriels spécifiques à MySQL, notamment Comment installer MySQL 8 sur
Étape 1 - Télécharger le référentiel MySQL APT
Depuis MySQL 8 n'est pas inclus dans les dépôts officiels d'Ubuntu 18.04 , nous devons télécharger son paquet Debian . La version actuelle officiellement disponible de MySQL sur Ubuntu 18.04 est 5.7.26 . Utilisez la commande ci-dessous pour télécharger le référentiel APT le plus récent.
# Download MySQL APT Repository
wget –c https://dev.mysql.com/get/mysql-apt-config_0.8.13-1_all.deb
Il téléchargera le package Debian officiel pour installer MySQL 8.
Étape 2 - Installer le référentiel MySQL
Utilisez la commande mentionnée ci-dessous pour commencer à installer le référentiel MySQL à l'aide du référentiel que nous avons téléchargé à l'étape précédente.
sudo dpkg -i mysql-apt-config_0.8.13-1_all.deb
Il vous demandera de choisir parmi les options disponibles, comme indiqué sur la figure 1. Gardez l'option par défaut sélectionnée et appuyez sur la touche Entrée pour démarrer l'installation.

Image 1
Sur l'écran suivant, le programme d'installation vous demandera de choisir la version de MySQL à installer comme indiqué sur la figure 2. Gardez mysql-8 sélectionné et appuyez sur la touche Entrée.
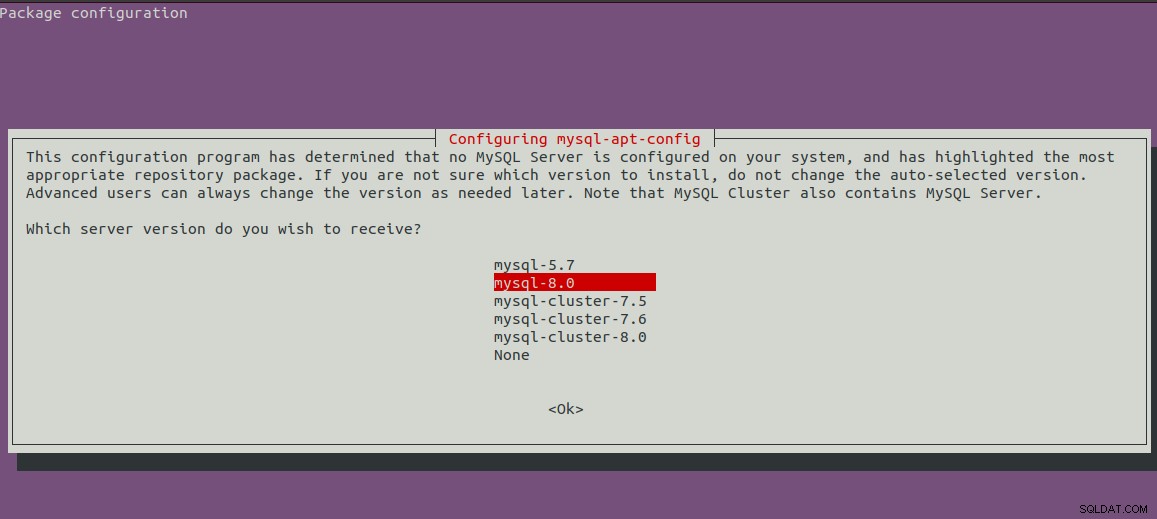
Image 2
Il affichera le premier écran avec la version sélectionnée de MySQL. Appuyez maintenant sur la touche fléchée vers le bas et sur la touche fléchée suivante pour passer aux options OK, comme illustré à la Fig 3.
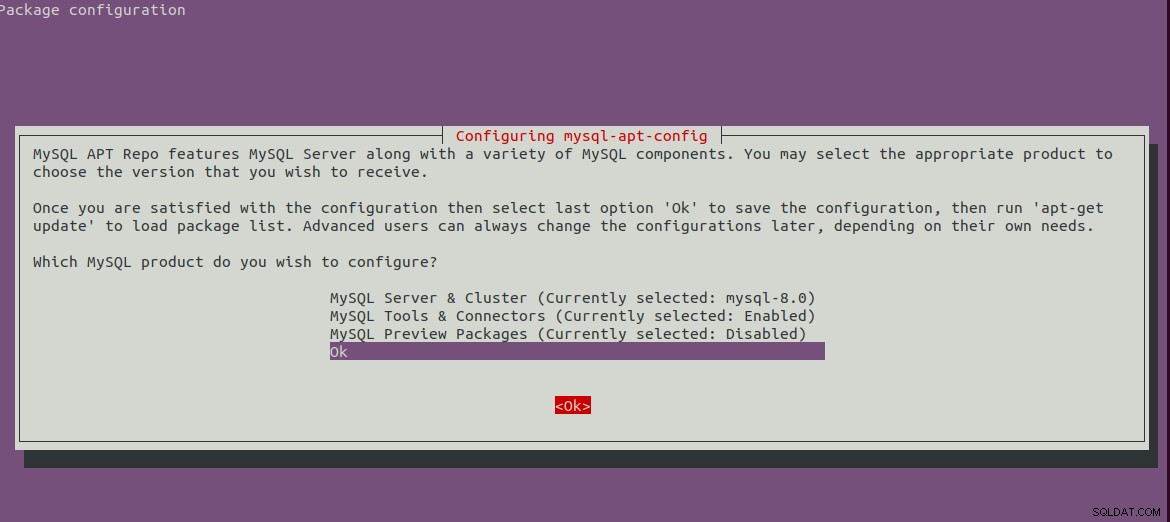
Image 3
Appuyez sur la touche Entrée pour démarrer l'installation. Il affichera les messages mentionnés ci-dessous après avoir terminé l'installation.
bravo@pc1:/setups/database$ sudo dpkg -i mysql-apt-config_0.8.13-1_all.deb
Selecting previously unselected package mysql-apt-config.
(Reading database ... 200223 files and directories currently installed.)
Preparing to unpack mysql-apt-config_0.8.13-1_all.deb ...
Unpacking mysql-apt-config (0.8.13-1) ...
Setting up mysql-apt-config (0.8.13-1) ...
Warning: apt-key should not be used in scripts (called from postinst maintainerscript of the package mysql-apt-config)
Étape 3 - Actualiser les référentiels système
Actualisez maintenant les référentiels système à l'aide de la commande mentionnée ci-dessous.
sudo apt-get update

# It must show MySQL 8 repos
bravo@pc1:/setups/database$ sudo apt-get update
Hit:1 http://repo.mysql.com/apt/ubuntu bionic InRelease
Hit:2 http://in.archive.ubuntu.com/ubuntu bionic InRelease
Hit:3 http://in.archive.ubuntu.com/ubuntu bionic-updates InRelease
Hit:4 http://in.archive.ubuntu.com/ubuntu bionic-backports InRelease
Hit:5 http://security.ubuntu.com/ubuntu bionic-security InRelease
Get:6 http://repo.mysql.com/apt/ubuntu bionic/mysql-8.0 Sources [962 B]
Get:7 http://repo.mysql.com/apt/ubuntu bionic/mysql-8.0 i386 Packages [7,472 B]
Get:8 http://repo.mysql.com/apt/ubuntu bionic/mysql-8.0 amd64 Packages [7,463 B]
Fetched 15.9 kB in 3s (5,556 B/s)
Reading package lists... Done
Il actualisera le cache système pour obtenir des mises à jour sur les versions les plus récentes des packages disponibles.
Étape 4 - Installer le serveur MySQL
Après avoir mis à jour le cache système, nous pouvons commencer à installer le serveur et le client MySQL à l'aide de la commande mentionnée ci-dessous.
# Install MySQL Server 8
sudo apt-get install mysql-server mysql-client
Appuyez sur Y pour confirmer et poursuivre l'installation. Avec cela, MySQL est installé comme nous le faisons avec le package par défaut disponible sur les référentiels Ubuntu. L'installation demandera également de choisir
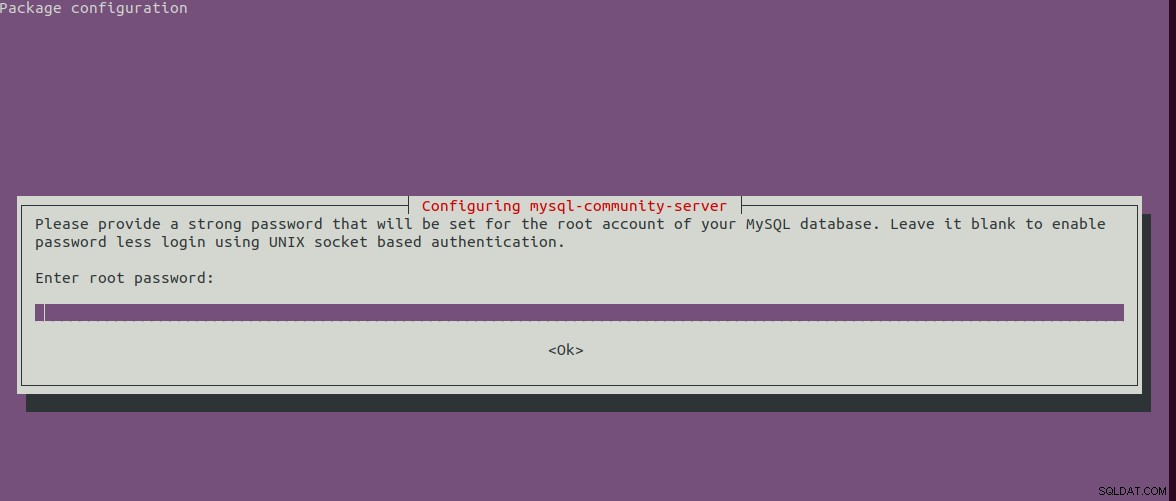
Fig 4
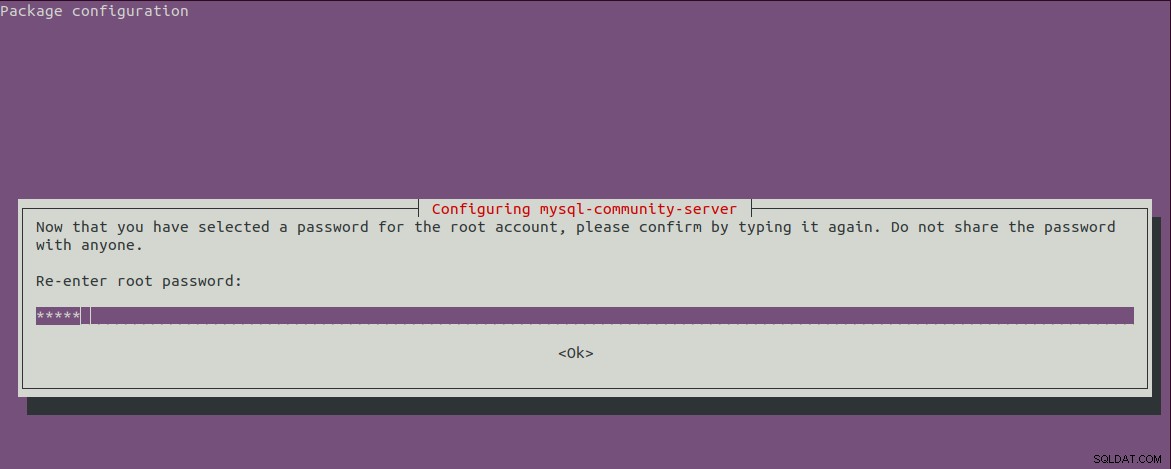
Image 5
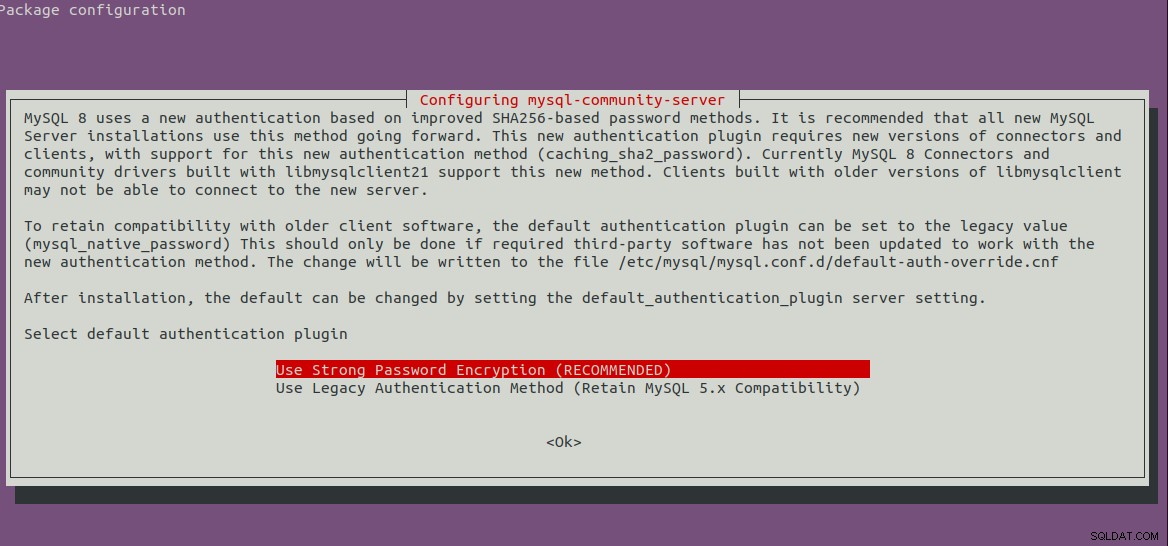
Image 6
Étape 5 - Installation sécurisée de MySQL
Nous devons également sécuriser l'installation à l'aide de la commande mentionnée ci-dessous.
sudo mysql_secure_installation
Il vous demandera de définir le mot de passe root et quelques questions de sécurité. Les étapes complètes suivies par moi sont comme indiqué ci-dessous.
bravo@pc1:/setups/database$ sudo mysql_secure_installation

Securing the MySQL server deployment.

Enter password for user root:

VALIDATE PASSWORD COMPONENT can be used to test passwords
and improve security. It checks the strength of password
and allows the users to set only those passwords which are
secure enough. Would you like to setup VALIDATE PASSWORD component?

Press y|Y for Yes, any other key for No: y

There are three levels of password validation policy:

LOW    Length >= 8
MEDIUM Length >= 8, numeric, mixed case, and special characters
STRONG Length >= 8, numeric, mixed case, special characters and dictionary                  file

Please enter 0 = LOW, 1 = MEDIUM and 2 = STRONG: 1
Using existing password for root.

Estimated strength of the password: 25
Change the password for root ? ((Press y|Y for Yes, any other key for No) : n

 ... skipping.
By default, a MySQL installation has an anonymous user,
allowing anyone to log into MySQL without having to have
a user account created for them. This is intended only for
testing, and to make the installation go a bit smoother.
You should remove them before moving into a production
environment.

Remove anonymous users? (Press y|Y for Yes, any other key for No) : y
Success.


Normally, root should only be allowed to connect from
'localhost'. This ensures that someone cannot guess at
the root password from the network.

Disallow root login remotely? (Press y|Y for Yes, any other key for No) : y
Success.

By default, MySQL comes with a database named 'test' that
anyone can access. This is also intended only for testing,
and should be removed before moving into a production
environment.


Remove test database and access to it? (Press y|Y for Yes, any other key for No) : y
 - Dropping test database...
Success.

 - Removing privileges on test database...
Success.

Reloading the privilege tables will ensure that all changes
made so far will take effect immediately.

Reload privilege tables now? (Press y|Y for Yes, any other key for No) : y
Success.

All done!
bravo@pc1:/setups/database$
Les étapes ci-dessus suppriment la base de données de test et les utilisateurs anonymes. Il interdit également la connexion à distance pour s'assurer que le serveur est accessible localement soit en utilisant 127.0.0.1 ou localhost .
Utilisez la commande mentionnée ci-dessous pour vérifier si le serveur MySQL est en cours d'exécution.
bravo@pc1:/setups/database$ systemctl status mysql
● mysql.service - MySQL Community Server
   Loaded: loaded (/lib/systemd/system/mysql.service; enabled; vendor preset: enabled)
   Active: active (running) since Thu 2019-08-15 10:40:47 IST; 4min 45s ago
     Docs: man:mysqld(8)
           http://dev.mysql.com/doc/refman/en/using-systemd.html
  Process: 28669 ExecStartPre=/usr/share/mysql-8.0/mysql-systemd-start pre (code=exited, status=0/SUCCESS)
 Main PID: 28708 (mysqld)
   Status: "Server is operational"
    Tasks: 38 (limit: 4915)
   CGroup: /system.slice/mysql.service
           └─28708 /usr/sbin/mysqld

Aug 15 10:40:45 bravo systemd[1]: Starting MySQL Community Server...
Aug 15 10:40:47 bravo systemd[1]: Started MySQL Community Server.
Étape 6 - Vérifier la version et l'accès
Vérifiez la version du serveur que nous avons installée et assurez-vous également que le serveur est accessible à l'aide du mot de passe root que nous avons configuré.
# Check version
sudo mysql --version
mysql  Ver 8.0.17 for Linux on x86_64 (MySQL Community Server - GPL)

# Login
sudo mysql -u root -p
Étape 7 - Commandes importantes
Cette section présente certaines des commandes importantes pour démarrer, arrêter et redémarrer le serveur.
# Check server status
sudo service mysql status

# Stop server
sudo service mysql stop

# Start server
sudo service mysql start

# Restart server
sudo service mysql restart
Étape 8 - Utilisation des plugins de mot de passe
Si vous avez choisi d'utiliser l'option de plug-in de mot de passe pour la compatibilité des mots de passe avec la version 5.7, il peut être nécessaire de se connecter au serveur MySQL en utilisant le compte avec
# Login to MySQL

# Check password plugin of root user
SELECT user,authentication_string,plugin,host FROM mysql.user;

# Note the password plugin of root user
+------------------+-------------------------------------------+-----------------------+-----------+
| user             | authentication_string                     | plugin                | host      |
+------------------+-------------------------------------------+-----------------------+-----------+
| root             |                                           | auth_socket           | localhost |
+------------------+-------------------------------------------+-----------------------+-----------+

# Change password plugin of root user to native
ALTER USER 'root'@'localhost' IDENTIFIED WITH mysql_native_password BY '<pw>';

# Apply changes
flush privileges;

# Check password scheme of user
SELECT user,authentication_string,plugin,host FROM mysql.user;

# Note the password plugin of root user
+------------------+-------------------------------------------+-----------------------+-----------+
| user             | authentication_string                     | plugin                | host      |
+------------------+-------------------------------------------+-----------------------+-----------+
| root             | *E5C4F73D963132CEF9BB4PA79LA818C08BAQC300 | mysql_native_password | localhost |
+------------------+-------------------------------------------+-----------------------+-----------+

# Change to new and recommended password plugin
ALTER USER 'root'@'localhost' IDENTIFIED WITH caching_sha2_password BY '<pw>';

# Apply changes
flush privileges;

# Check password scheme of user
SELECT user,authentication_string,plugin,host FROM mysql.user;

+------------------+------------------------------------------------------------------------+-----------------------+-----------+
| user             | authentication_string                                                  | plugin                | host      |
+------------------+------------------------------------------------------------------------+-----------------------+-----------+
| root             | $A$005$THISISACOMBINATIONOFINVALIDSALTANDPASSWORDTHATMUSTNEVERBRBEUSED | caching_sha2_password | localhost |
+------------------+------------------------------------------------------------------------+-----------------------+-----------+
C'est ainsi que nous pouvons installer la version la plus récente du serveur MySQL, c'est-à-dire MySQL 8 sur Ubuntu 18.04 LTS.


